Basic Rules Of Portraiture
This page will cover several topics that are important to make a good portrait:
- Purpose of Portrait
- Type of Portraits
- Head Views
- Facial Analysis
- Rapport with Subject
- Subject's Position
- Camera's Position
- Backgrounds
- Equipment
Purpose of Portrait
The portrait you create may be used for different purposes. The most often it is used for personal purposes of the subject (i.e. a photo-album, a gift, etc.). Another is for business purposes, when it somehow relates to the business of the subject. Next is the glamour and advertisement. Each of these types has its own specifics and approaches to create it.
In your work you have to know and consider these purposes of portraiture. In some of them you have to satisfy the subject of the portrait and make it flattering. In others you have to create an exact color match as in advertisement of a lipstick.
~ Top ~Type of Portraits
There are three basic types of portraits:
- head and shoulders,
- 3 quarters length and
- full length
These types as you see refer to how the subject will be included into the frame.
Head Views
Often you will read or hear as photographers refer to full, 1/3, 3/4 or profile view of the subject. Basically it means that the head of the subject is turned in such a way there only a specific part of it is visible. Here are the explanations:
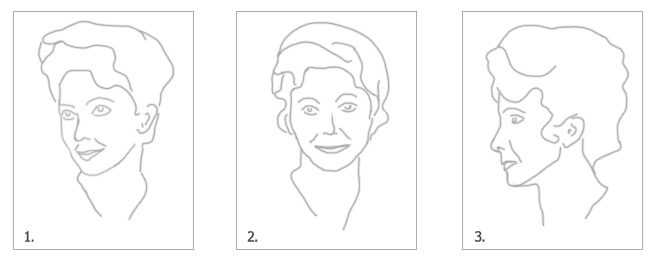
- 1/3 or 3/4 View - different photographers can refer the same position by these names. With the view the subject's head is turned to the left or right so one of the ears is not visible and the corner of the farthest eye is touching the borderline of the face. This position creates a most pleasant and most preferable view by professional photographers.
- Full View - the subject looks straight ahead and both of his ears are clearly visible. It is rarely the best way to make a portrait, because this position is very static and usually used in passports or other documents.
- Profile View - in this position the subject's head is turned 90 degrees from the camera and only one eye and one ear are visible. This view creates a bit dramatic image and requires good facial traits of the subject, especially nose and chin.
Facial Analysis
Before making a portrait you have to look at the subject and decide what head position will be most flattering for him/her. This decision should be based on the analysis of subject's facial traits. There are a few things you have to consider (see Facial Analysis article for more information on this subject):
- Hair - consider which side has fuller hair and bring the fuller hair side to the camera view by turning the head in opposite direction.
- Bald head - move the camera lower and keep the bald area in shadow
- Eyes - some people have eyes of different sizes or other defects. One of solutions to hide a smaller eye is to make it farther from the camera, because inner corner of the eye has wider angle than outer corner. To hide defects of an eye - keep it in shadow and use 3/4 view.
- Nose - if the nose has a bump you can hide it by lighting it so that it will not affect the edge of light and shadow. As it was said in another page, the eye is attracted to the contrast areas of the frame - edges of light and shadow. If the nose is too long - move the camera lower, too short - move the camera up
- Chin - with a week chin you may want to lower the camera and move the chin a bit up, for a prominent chin use the opposite approach.
- Ears - if the subject has prominent ears you should consider a profile view or 3/4 view and keep the defective ear in shadow.
Another suggestion for your portraiture work is to keep the final portrait in your mind and direct the subject to take a pose while you looking through the viewfinder of the camera. Pose the subject first and then change the lights to achieve the desired light pattern!
Rapport with Subject
Probably the most important issue for all of portraiture work is the rapport with you subject. When the subject is tense and shy no portrait is good enough to satisfy you or the client. This tension will be reflected in your portraits. The same is true regarding your own tension. That's why it is important to make the subject relax and be natural. The simplest solution is to be relaxed yourself and make a conversation with the subject during the session, to encourage the subject by making compliments about how he is doing, posing and etc. But be aware extremely big smiles are not popular.
~ Top ~Subject's Position
This topic is partially a continuation of the previous one. To create a natural look you have to come up with a natural pose. There is one pose I want to suggest you. Have the subject seated on a stool (without the back) looking at about 45 degrees from the camera, let him put the right leg upon the left one, lean him to the front and tilt his head a bit to the left. You may want to have his right arm to rest against his right hip, so his right shoulder will be a bit higher than the left one. This pose works for female and male subjects, though is more preferable for males. Slight modifications for the female subject should be considered: don't cross the legs and put less tension into the arms. I have to notice that you can reverse the direction of the pose to opposite.
Camera's Position
There is a basic rule for the camera position, which is used for all kinds of portraits. It is to place the camera on the eye level of the subject. It could be a child or a basketball player, but the rule is the same. Though there is some consideration you have to know. To create an impression of a thoughtful and smart person you may shift your camera a bit higher than the eye level, but be careful of distortions in the facial traits of the subject. Another point is taking picture of photo-models for glamour magazines - the camera is placed on the mouth level of the subject.
When you encounter certain imperfections in the subjecct's face or figure, you may be forced to change the camera position to reduce or completely hide the imperfections - read more in the article "Facial Analysis".
~ Top ~Backgrounds
If you use a studio to take the portraits (not a location) than you have to take care about the background of the subject (although some photographers may bring their background to the location as well). Most of the times photographers use a seamless paper backgrounds. The background should be about 1.5-2 meters away from the subject. The main rule about how far to place the subject from the background is to avoid the shadows on the background.
There is a general rule: light backgrounds are best to produce a delicate effect; dark backgrounds are best for dramatic effects. This rule should be amended in regards to the tonality of the subject. You may consider to use the background in contrast to your subject to give more depth and snap to the image. The color of the background plays its own role in the portrait and may be distractive if you don't consider it carefully. For ladies, girls and babies blue backgrounds are widely used. For gentlemen to create a dramatic effect I may suggest brown colors. Another good choice for portraits is dark green color that is a complementary color to the human skin and adds a bit of contrast. You may change the tonality of the background by spilling more or less light on it.
Equipment
I want to say that the equipment doesn't produce a good portrait, it is your skills and desire. You may produce a professional portrait with a 35mm camera, a window light and a wall as background. But here I will try to list the basic equipment for studio portraiture, which will help you ensure the quality of your portraits and give you much more flexibility:
- 35 mm or Medium format camera
- 85-105mm lens (the "portrait range" of the focal length)
- A cable release about 1 meter
- A sturdy tripod
- Background paper with a stand or a wall mount
- A bar stool with a short back
- 3 lights on stands
- A reflector board
- Space about 9x12 feet (3x4 meters)


- Font size:


