Ultimate Makeup
Every photographer who makes portraits or takes photographs of people, be it a wedding or event photographer, at some point in time encounters a need to retouch the photograph - to make people look better. In this article I will guide you through a series of steps to improve skin tones, modify shadow and light patterns to increase the impact, and enhance the eyes and hair to create a striking portrait. Note: this article is the second edition of the one with the same name (PDF: Ultimate Makeup - 2.54Mb), which had controversial responses from readers. Some of the previously mentioned techniques were omitted here, but they will appear in another article, because the topic on retouching is quite extensive. So, here are the steps:
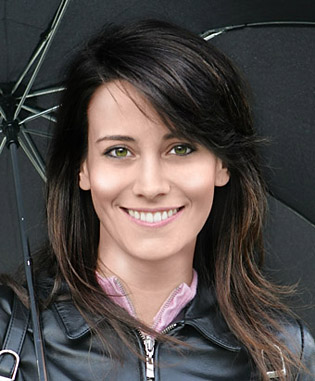
Before we dive into the details of the retouching process, let's review the original photograph and the final result, which we are trying to achieve:


As you see the original photograph is more like a snap shot, which it is. This photograph was taken on a cloudy day (very diffused light) and without any special lighting or posing - just a quick press of a button. And, of course, we want to make something beautiful out of it. That's why we will retouch the photograph: add some color to the skin tones, improve shadows and highlights to give the face a three dimensional look, enhance the eyes and do something about the hair. In the photograph on the right you can see the final result, which is drastically better than the original.
Skin Tones
Our first step will be to improve the skin tones - make the skin look better or even give it some tan. Women know that before actually putting on a makeup you would put the base - even the tones, and openly after that you can apply the makeup. And here we will do the same - do the base first.
To do so, we have to pick a color that would look naturally on our subject. In my example, I used the color #7f5747 . It may appear to be too dark, such color would be appropriate for african american lady, but when you use it via Color blending mode, it becomes less intense and looks more like this: (#e3b6a5). So, don't hesitate when you choose a much darker color than you would expect the subject to have.
After you picked the color - create a new layer atop of your photograph (Ctrl-Shift-Alt-N) and change its blending mode to Color. Then paint over the exposed skin - to cover everything except eyes, nostrils, mouth. Don't forget to paint hands. Use Gaussian Blur filter to make the edges smoother as well as the transition to other areas.
Lately I've discovered a better approach to change the skin color. It is posted in the blog - "Photoshop: Changing Skin Color". I suggest you consider it before applying color via Color blending mode.
Note: You can get some colors from the following charts: RetouchPro.com and DeviantArt.com.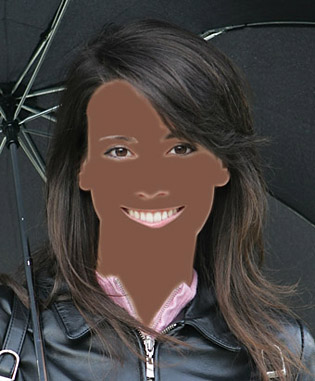

Above you can see how the Color blending mode changes the actual color. The same way (but with a different color) you can make skin look tanned.
Even when we have applied the base color, the photograph looks dull. The Color mode somewhat preserves the shadow and highlights of the original image, but here it doesn't help - the face lacks the three dimensional look. And this is the topic for our next step.
~ Top ~3D Look
The goal of this step is to create a three dimensional look. As you already know, our eye recognizes the third dimension by the dark and light areas that are created by the shadows and highlights of the falling light. And as you can see this photograph (even after the improving the skin tone) is lacking in this department. So, it only means that we have to create the shadows and the highlights. And here is how we do it.
The following paragraphs explain how to create shadow and highlights by blurring the brush strokes of different colors. However you may want to try using a brush with opacity and flow turned down to values around 2-7% and AirBrush setting turned on. The strokes of such brush will be very light and somewhat invisible at first, but they are there, and be careful with it's application.
Shadows
First, create one more new layer atop of the one with the skin color (Ctrl-Shift-Alt-N) and change the blending mode into Multiply. Leave the brush color as you used it in the previous step. Then paint the areas where the shadows should be (as is shown in the left image). And to make it look real apply some Gaussian Blur with a radius, which smoothens the transition to the medium lit areas.
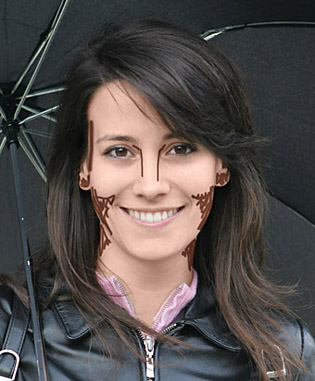

Just a few notes on the shadow areas. The shadow on the cheeks emphasizes the cheekbones (similar to the famous photo models). The lines along the nose make it look slimmer and nicely make it visible. The line on the side of the head by the eye adds the depth to the head. The neck is shaped by the two shadows on both sides of it. And, finally, I've darkened the ears (the visible areas) to somewhat hide them from the eye. My method to draw the shadows is one by one: first you paint one shadow and apply the Gaussian Blur filter, if it works, rollback one step (undo the filter) and draw another shadow, if it doesn't work - rollback two steps and do it over again.
~ Top ~Highlights
You can compare the results with the image above (with just the skin tones) and you will definitely see the difference. But we aren't done yet. Our next step is to add the highlights. With this photograph I used simple white brush in Normal blending mode, though you may try other variations of blending, such as Lighten, Overlay and so on.
The method of creating highlights is similar to the applying shadows - paint with the white brush and blur: When you are done, adjust the opacity of the layer to make it look natural and not too distracting.
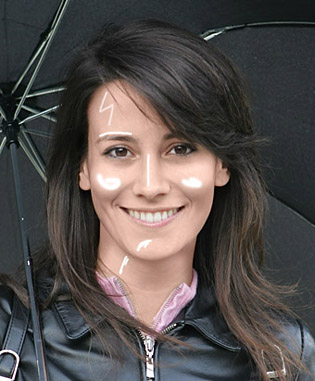

Let's review where I placed the highlights. First of all, I've placed the highlights with the idea that the light is to left and up from the photographer. And it aligns with the catchlights in the eyes (actually it is deducted from there). The forehead is slightly marked by the Harry Potter's scar, just to make it brighter a bit. The brow is marked with the streak of highlight to protrude it slightly. The nose and the cheeks are very obvious; they are the most prominent "bumps" on a face. And, of course, the chin, though be careful - don't paint above that small crevice, it will look unnatural. Finally, a small touch to the the neck to finish the 3D look.
~ Top ~Smile
One small improvement we need to made is the smile. And that's should not be a problem, the modifications are simple enough. We create a new layer with blending mode set to Overlay, where we brush the teeth with a white brush. It will make them whiter. Make sure that the teeth look natural; do not overdo it. And one more thing - as we've done with the skin, the same we do with the lips. Choose some bright color and in a new layer with Color blending mode brush the lips. In my case I used the following color: #6c2734 . Though, as noted before, when applied the color looks pale and natural.

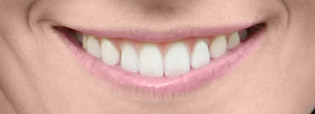
In the example above the new color was almost a perfect match to the original one. And actually you may say that there is no lipstick applied, so you may prefer to apply some lipstick and enhance the lips.
~ Top ~Eyes
The beauty is in the eyes of the beholder. It is true for all in the life, and the eyes are the most important element of the photograph. That's why we will pay extra attention and effort to the windows of soul. And it will several steps to complete:
Exposure & Highlights
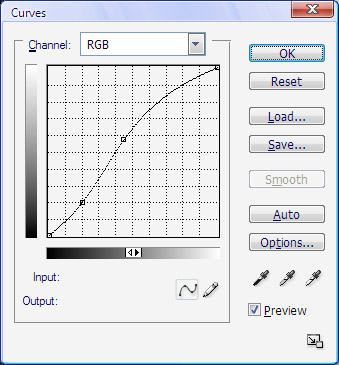
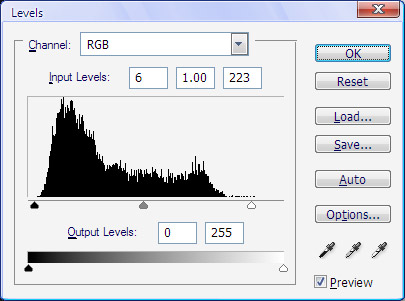 Because our eyes reside in the eye sockets, which are like hollows, usually there is little light reaches the eyes. And that's why our first step is to restore the exposure. To do so, you need to select the eyes (whites and iris) of both eyes (hold Shift when do the selection of the second eye) and apply some feathering (Ctrl-Alt-D) - radius 3 to 5. After that you can create an adjustment layer "Levels" (or "Curves" if you prefer) and adjust the exposure - move the right white triangle to the left (to the beginning of the histogram or near it) as shown on the right image. After that don't forget to deselect (Ctrl-D).
Now we can brighten specific areas of the eyes and increase the impact. And again we create a new layer, set the blending mode to Overlay, choose a white brush and slightly paint the whites. I suggest first to set opacity to 20-30% and apply the incremental whitening to all areas, before going to the next iteration. By doing so, you will apply even changes to both eyes.
When the whites are bright enough, we shift our attention to the iris. In each iris there are two areas that we need to highlight - the catchlight and the opposite to catchlight area. And both these areas should be highlighted. Though be careful with the area opposite to the catch light, it's very easy to make it look unnatural.
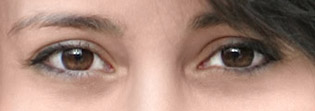
When the blood lines are visible in the whites, my approach is to create a new layer with Color blending mode, and with white brush paint over the whites. It will restore the clear and pleasant look to the eyes. If the lines are too strong, you may need to apply Healing brush atop of the previous layer (check the Sample All Layers checkbox in the tool bar) in order to smoothen the lines or totally remove them.
New Color
Sometimes we want to go dramatic and even give a new color to the eyes (or simply enhance the original color). And that's easy! We use Hue/Saturation dialog - select the iris of each eye (hold Shift when select the second eye to have the union of the selections). And create a new adjustment layer "Hue/Saturation", where you simple move the sliders to achieve the color and look you want.

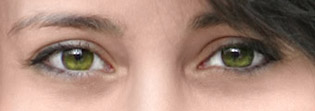
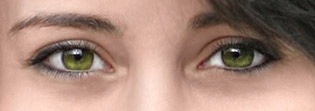
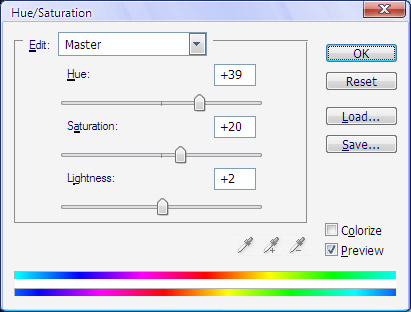 Saturation and Lightness sliders can add additional effects and brighten or darken the eyes. In the images above you see that after the manipulations the eyes look brighter and "stronger". You may even try some unusual colors (some people wear different contact lenses to change the eye color) to create various looks, such as in horror movies or in cartoons. My adjustments are shown in the dialog on the right.
Iris & Brows
In the next step I killed two birds with one stone - using the same layer (adjustment layer "Curves" in Multiply blending mode - no changes to the curves) I darkened the pupil, edges of the iris and the brows. All of it improves the contrast and ultimately attracts more attention to the eyes. Below is the final result and the layer mask, where I painted with white to let the effect through:

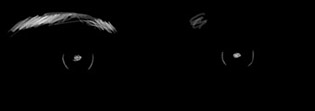
Take a look at the left brow - before there was a slight gap, after the manipulation the gap is almost invisible. And another thing, when you are done with painting, you have two ways to adjust the intensity - the opacity of the layer and the curves itself. In this example I've slightly curved down the usually straight line in the "Curves" dialog.
Note: When we created the adjustment layer without the changes (as we've done here with "Curves" it simply simulates the sum of all layers below [more like a duplicate layer] without the memory strain).Eyelashes
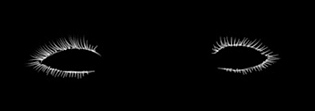
What woman wouldn't want to have big and lushes eyelashes? Maybe just a very few. So, in our next step we reproduce them artificially. For the best results use a pen tablet (i.e. Wacom table).
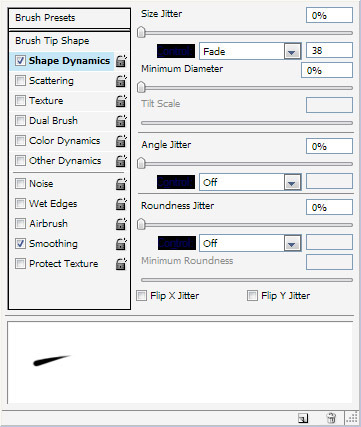 First we have to use the right brush. Go to the Brush settings and select a hard brush of a small size (2-3 pixels). And in the Shape Dynamics for Size Jitter choose Fade with radius around 25-40% (depends on the size of the image). Second in Other Dynamics you may select Pen Pressure for Opacity Jitter with radius around 10-20$. Smoothing is another useful setting.
Now we have to create a new layer and change the blending mode to "Linear Burn" and add the layer mask filled with black (hold Alt while clicking on the layer mask icon in the layer palette).
Finally we are ready to paint. You need to apply small strokes from the edge of the eyelid (where the eyelashes originate) away from the eye. Use slightly curves strokes to create 3D look. Apply stronger pressure in the beginning reducing it at the end of the stroke.
Below you can see the results of our work: the final image and the layer mask. There is one small detail that will improve the overall look - the line along the edge of the eyelids. Don't forget to switch to a regular brush with soft edges of a small size when are going to apply it.
All these incremental changes are quite small by itself, but when they are applied together it really change the look.
Size Matters
Usually with time size of our eyes diminishes, and we have to compensate for it in order to look our portrait look gorgerous. After all those changes we made, we create a new layer with all we see on the photograph - Alt-Ctrl-Shit-E (merge all visible layers into a new one). After that we select the eyes (without the brows). And press Ctrl-T to enter into the transformation mode, where we lock the proportion of height and width (a small "link" icon between the fields for height and width in the tool settings under the main menu). Then increase the size of the selected area by 2% - simple enter 102 in any of the fields for height and width. Click Enter. Adjust the position of the eye to make it look natural and simmetrical. Repeat it for the other eye.
~ Top ~Hair
So, we are almost done in our major changes. We've improved the skin and the eyes. The other important piece that is left is the hair. And let's tackle this one. Below are the photograph (the current state) with out any changes to the hair and beside the one with the emphasized highlights and a better contrast (somewhat darker overall):

 My first step with this photograph would be to improve overall contrast of the hair and emphasize the highlights. Some of the highlights are very subtle in the original image, so we will need to bring them out. The method to do so is quite easy: create a new adjustment level "Curves" and bring the dark areas down and highlights with midtones up, as shown on the image. Don't pay attention to the the rest of the image at this moment, because you will have to apply a layer mask and hide the effect for everything except the hair.
And when you see that the highlights improved, you can apply the layer mask and paint everything except the hair with a black color.
Note: When you drag the top (highlights) of the curve up, the highlights in the hair will be emphasized. But at the same moment you can drop the darker areas and make overall look of the hair darker (for brunettes).So, you've done the curves and nothing has changed. May be the highlights were not that visible or prominent in the first place. What to do then? Grab the dodge tool and add your own highlights. Now create a layer with the all changes - Alt-Ctrl-Shift-E (merge all visible layer into one atop the stack). Apply the mask as you've done with the curves above - hold Ctrl and click on the mask of the Curves layer (the area will be selected), now create the layer mask by clicking the icon at the bottom of the layer palette.
Ensure that the layer with the hair is active (not its layer mask) and start. Pick the dodge tool in the toolbar, select Highlights or Midtones in the dropdown list in the tool settings (under the main menu) and set opacity around 5-10%. And start painting on the hair with gentle strokes following the flow of the hair. The stroke should be long enough to create the illusion of the highlights, and you may need to paint several times over the same area, but try to shorten the strokes each time you paint within the same area - so there is a definite highlight within slightly darker bright streak.
A note on grey hair - time passes and adds a few grey streaks into our hair. To hide them, we set the blending mode of a new layer into Color Burn. Sample the color from the hair (hold Alt while in Brush tool and click on the hair). And paint those grey streaks with the brush - choose the size and opacity to better suit the size and area you are painting.
~ Top ~Final Touches
What's left? Hmm... A lot, I would say. For example, we have not done anything about skin repair, which is done with a Healing Brush and some other techniques. But this is another topic that I will try to cover later in a separate article. (Read the blog post "Photoshop: Skin Improvement (Totally & Quickly)" to find out more on this topic.) Meanwhile we can improve the dark spots under the eyes using the Healing Brush. Actually, we will use Patch Tool within the same subset as the Healing Brush - click and hold on the Healing Brush icon until the submenu appears, then select Patch Tool.
The idea here is to select the region of the skin (not the eyes) under each eye and reuse the texture and some color from the cheeks. So, draw a tight selection around the dark ares (eye bags?) under the eyes and then drag this whole area over the cheek below, but make sure that the new selection doesn't include any dark spots from the crevices or shadows on the face. You will see that the eye bag has disappeared and was replaced by a smoother area. Repeat the operation for the other side.
Note: Again, I recommend to perform these operations on a new empty layer with the tool setting "Sample All Layers" checked on. Then you can adjust the opacity to ensure that the changes look natural and you can always return to the original state - non-destructive editing!Well, my friend, that's it for now. You should have a much better photograph than in the beginning of this exercise. I hope it helps. ![[end of the text]](http://www.romanzolin.com/img/misc/text_end.png "End of the article")
~ Top ~


- Font size:


